前言
2020 年 6 月 10 日 Nginx 官方博客发文《Introducing a Technology Preview of NGINX Support for QUIC and HTTP/3》,同时对外发布了 QUIC 版 Nginx 的分支传送,部署说明传送。喜欢尝鲜的我自然是要体验一下的。
CloudFlare 官方 quiche 补丁版推荐
操作环境
CentOS 7.7- Ubuntu 20.04 LTS
准备工作
- 安装相关依赖
# CentOS
sudo yum install mercurial psmisc net-tools wget curl build-essential lsb-release cmake golang libunwind-dev git libpcre3-dev zlib1g-dev

# Ubuntu
sudo apt-get install mercurial golang libgeoip-dev libunwind-dev libgoogle-perftools-dev- 拉取
QUIC版Nginx源码
hg clone -b quic https://hg.nginx.org/nginx-quic --insecure- 拉取支持
QUIC和HTTP/3的OpenSSL源码
# 这里我直接使用的是 Google 的 BoringSSL 作为 ssl 库
git clone https://boringssl.googlesource.com/boringssl
注意:官方的 OpenSSL 目前是不支持 QUIC 和 HTTP/3 的,但经过第三方修改而支持的有:
BoringSSL分支
git clone https://boringssl.googlesource.com/boringssltatsuhiro-t分支
git clone --depth 1 -b OpenSSL_1_1_1g-quic-draft-29 https://github.com/tatsuhiro-t/opensslakamai分支
git clone --depth 1 --branch master-quic-support https://github.com/akamai/openssl- 编译
BoringSSL
# 进入 BoringSSL 目录
cd /www/server/nginx/src/boringssl

# 创建用到的目录
mkdir -p build .openssl/lib .openssl/include

# 建立软链接
ln -sf /www/server/nginx/src/boringssl/include/openssl /www/server/nginx/src/boringssl/.openssl/include/openssl

# 生成库文件
touch /www/server/nginx/src/boringssl/.openssl/include/openssl/ssl.h

# 预编译
cmake -B/www/server/nginx/src/boringssl/build -H/www/server/nginx/src/boringssl

# 编译
make -C /www/server/nginx/src/boringssl/build

# 拷贝编译好的库文件
cp /www/server/nginx/src/boringssl/build/crypto/libcrypto.a /www/server/src/nginx/boringssl/build/ssl/libssl.a /www/server/nginx/src/boringssl/.openssl/lib- 准备 Nginx 模块
# 打补丁,使得 Nginx 使用 BoringSSL 时支持 OCSP Stapling
curl https://raw.githubusercontent.com/kn007/patch/master/Enable_BoringSSL_OCSP.patch | patch -p1

# jemalloc
git clone https://github.com/jemalloc/jemalloc.git
pushd jemalloc
./autogen.sh
make -j$(nproc --all)
touch doc/jemalloc.html
touch doc/jemalloc.3
sudo make install
echo '/usr/local/lib' | sudo tee /etc/ld.so.conf.d/local.conf
sudo ldconfig
popd

# zlib (Cloudflare)
git clone https://github.com/cloudflare/zlib.git
pushd zlib
./configure
popd

# libatomic_ops
git clone https://github.com/ivmai/libatomic_ops.git
pushd libatomic_ops
./autogen.sh
./configure
make -j$(nproc --all)
make install
sudo ldconfig
popd

# pcre
wget https://ftp.pcre.org/pub/pcre/pcre-8.44.zip
unzip pcre-8.44.zip&&rm pcre-8.44.zip
pushd pcre-8.44
./configure
popd

# ngx_brotli
# 支持使用包管理器安装的 brotli 库
git clone https://github.com/eustas/ngx_brotli.git
pushd ngx_brotli
git submodule update --init
popd

# ngx_pegespeed
git clone https://github.com/apache/incubator-pagespeed-ngx.git
mv incubator-pagespeed-ngx ngx-pagespeed
pushd ngx-pagespeed
wget https://dl.google.com/dl/page-speed/psol/1.13.35.2-x64.tar.gz
tar -xzvf 1.13.35.2-x64.tar.gz
popd

# 安装LuaJIT
wget http://luajit.org/download/LuaJIT-2.0.5.tar.gz
tar -xzvf LuaJIT-2.0.5.tar.gz
pushd LuaJIT-2.0.5
make && make install
popd

# redis2-nginx-module
wget https://github.com/openresty/redis2-nginx-module/archive/v0.14.tar.gz
tar xf v0.14.tar.gz
mv redis2-nginx-module-0.14 redis2-nginx-module

# 其它杂项
git clone https://github.com/arut/nginx-python-module.git
git clone https://github.com/alibaba/nginx-http-footer-filter.git
git clone https://github.com/openresty/replace-filter-nginx-module.git
git clone https://github.com/AirisX/nginx_cookie_flag_module
git clone https://github.com/aperezdc/ngx-fancyindex.git
git clone https://github.com/simplresty/ngx_devel_kit.git
git clone https://github.com/arut/nginx-dav-ext-module.git
git clone https://github.com/leev/ngx_http_geoip2_module.git
git clone https://github.com/sto/ngx_http_auth_pam_module.git
git clone https://github.com/openresty/headers-more-nginx-module.git
git clone https://github.com/wandenberg/nginx-sorted-querystring-module.git
git clone https://github.com/yaoweibin/ngx_http_substitutions_filter_module.git
编译安装
关于 Nginx 其它模块或详见博客其它相关文章
相关推荐
- 这是官方的
./auto/configure --with-debug --with-http_v3_module       \
                       --with-cc-opt="-I../boringssl/include"   \
                       --with-ld-opt="-L../boringssl/build/ssl  \
                                      -L../boringssl/build/crypto"
make- 这是整合了官方后的我的编译配置
# 进入源码目录
cd /www/server/nginx/nginx-quic

# 预编译
./auto/configure --user=www --group=www --prefix=/www/server/nginx --add-module=/www/server/nginx/src/lua_nginx_module --add-module=/www/server/nginx/src/redis2-nginx-module --add-module=/www/server/nginx/src/ngx_devel_kit --add-module=/www/server/nginx/src/ngx-pagespeed --add-module=/www/server/nginx/src/ngx_cache_purge --add-module=/www/server/nginx/src/nginx-sticky-module --add-module=/www/server/nginx/src/ngx_brotli --add-module=/www/server/nginx/src/nginx-http-concat --add-module=/www/server/nginx/src/nginx-sorted-querystring-module --add-module=/www/server/nginx/src/ngx_http_substitutions_filter_module --add-module=/www/server/nginx/src/headers-more-nginx-module --with-http_stub_status_module --with-pcre=/www/server/nginx/src/pcre-8.44 --with-zlib=/www/server/nginx/src/zlib --with-http_slice_module --with-http_ssl_module --with-http_v2_module --with-http_image_filter_module --with-http_gzip_static_module --with-http_gunzip_module --with-http_random_index_module --with-http_secure_link_module --with-stream --with-stream_realip_module --with-stream_ssl_module --with-stream_ssl_preread_module --with-ipv6 --with-http_sub_module --with-http_flv_module --with-http_addition_module --with-http_realip_module --with-http_mp4_module --with-google_perftools_module --with-http_geoip_module --with-http_v3_module --with-http_quic_module --with-stream_quic_module --with-ld-opt=-ljemalloc --with-cc-opt="-I../boringssl/include" --with-ld-opt="-L../boringssl/build/ssl -L../boringssl/build/crypto"

# 执行编译指令
make -j$(nproc --all)

# 复制新的编译好的执行文件 nginx,覆盖替换旧版本执行文件 nginx
mv /www/server/nginx/sbin/nginx /www/server/nginx/sbin/nginx.bak
cp /www/server/nginx/src/nginx-quic/objs/nginx /www/server/nginx/sbin/nginx

# 无痛升级
make upgrade

# 或
make install
配置文件
# 以官方配置为例
server {
            # for better compatibility it's recommended
            # to use the same port for quic and https
            listen 443 http3 quic reuseport;;
            listen 443 ssl http2;

            ssl_certificate     certs/example.com.crt;
            ssl_certificate_key certs/example.com.key;
            ssl_protocols       TLSv1.3;
            quic_retry on;
            ssl_early_data on;
            http3_max_table_capacity 50;
            http3_max_blocked_streams 30;
            http3_max_concurrent_pushes 30;
            http3_push 10;
            http3_push_preload on;

            location / {
                # required for browsers to direct them into quic port
                add_header Alt-Svc '$http3=":443"; ma=86400';
            }
        }
可能遇到的异常
- 异常信息
./auto/configure: error: certain modules require OpenSSL QUIC support.
You can either do not enable the modules, or install the OpenSSL library
into the system, or build the OpenSSL library statically from the source
with nginx by using --with-openssl=<path> option.- 解决办法
# 可能你没有执行上面的这一步
cp /www/server/nginx/src/boringssl/build/crypto/libcrypto.a /www/server/nginx/src/boringssl/build/ssl/libssl.a /www/server/nginx/src/boringssl/.openssl/lib

# 或将编译好的库libcrypto.a和libssl.a手动拷贝到/usr/local/lib目录下,执行
touch ../boringssl/.openssl/include/openssl/ssl.h

# 然后重新执行
make -j$(nproc --all)
测试
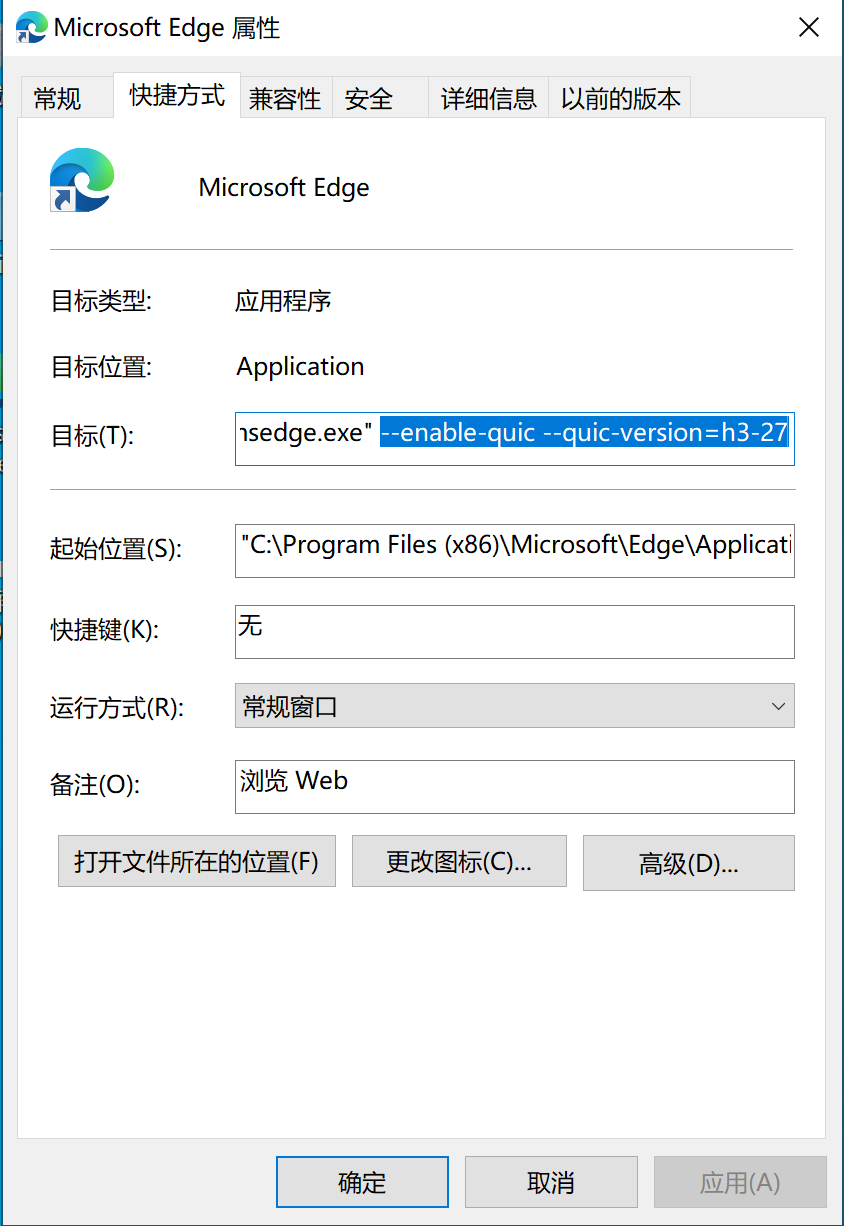
这里以 Windows 平台 Chrome v85 版 Edge 为例,快捷方式右键-属性,在目标末尾加上运行参数“--enable-quic --quic-version=h3-27”,记得以空格隔开。经自测,目前 Google Chrome Canary 最新版 v91.0.4455.0 只需要在配置里开启 QUIC 支持,无需额外添加启动参数即可直接支持 QUIC(最低h3-27)。
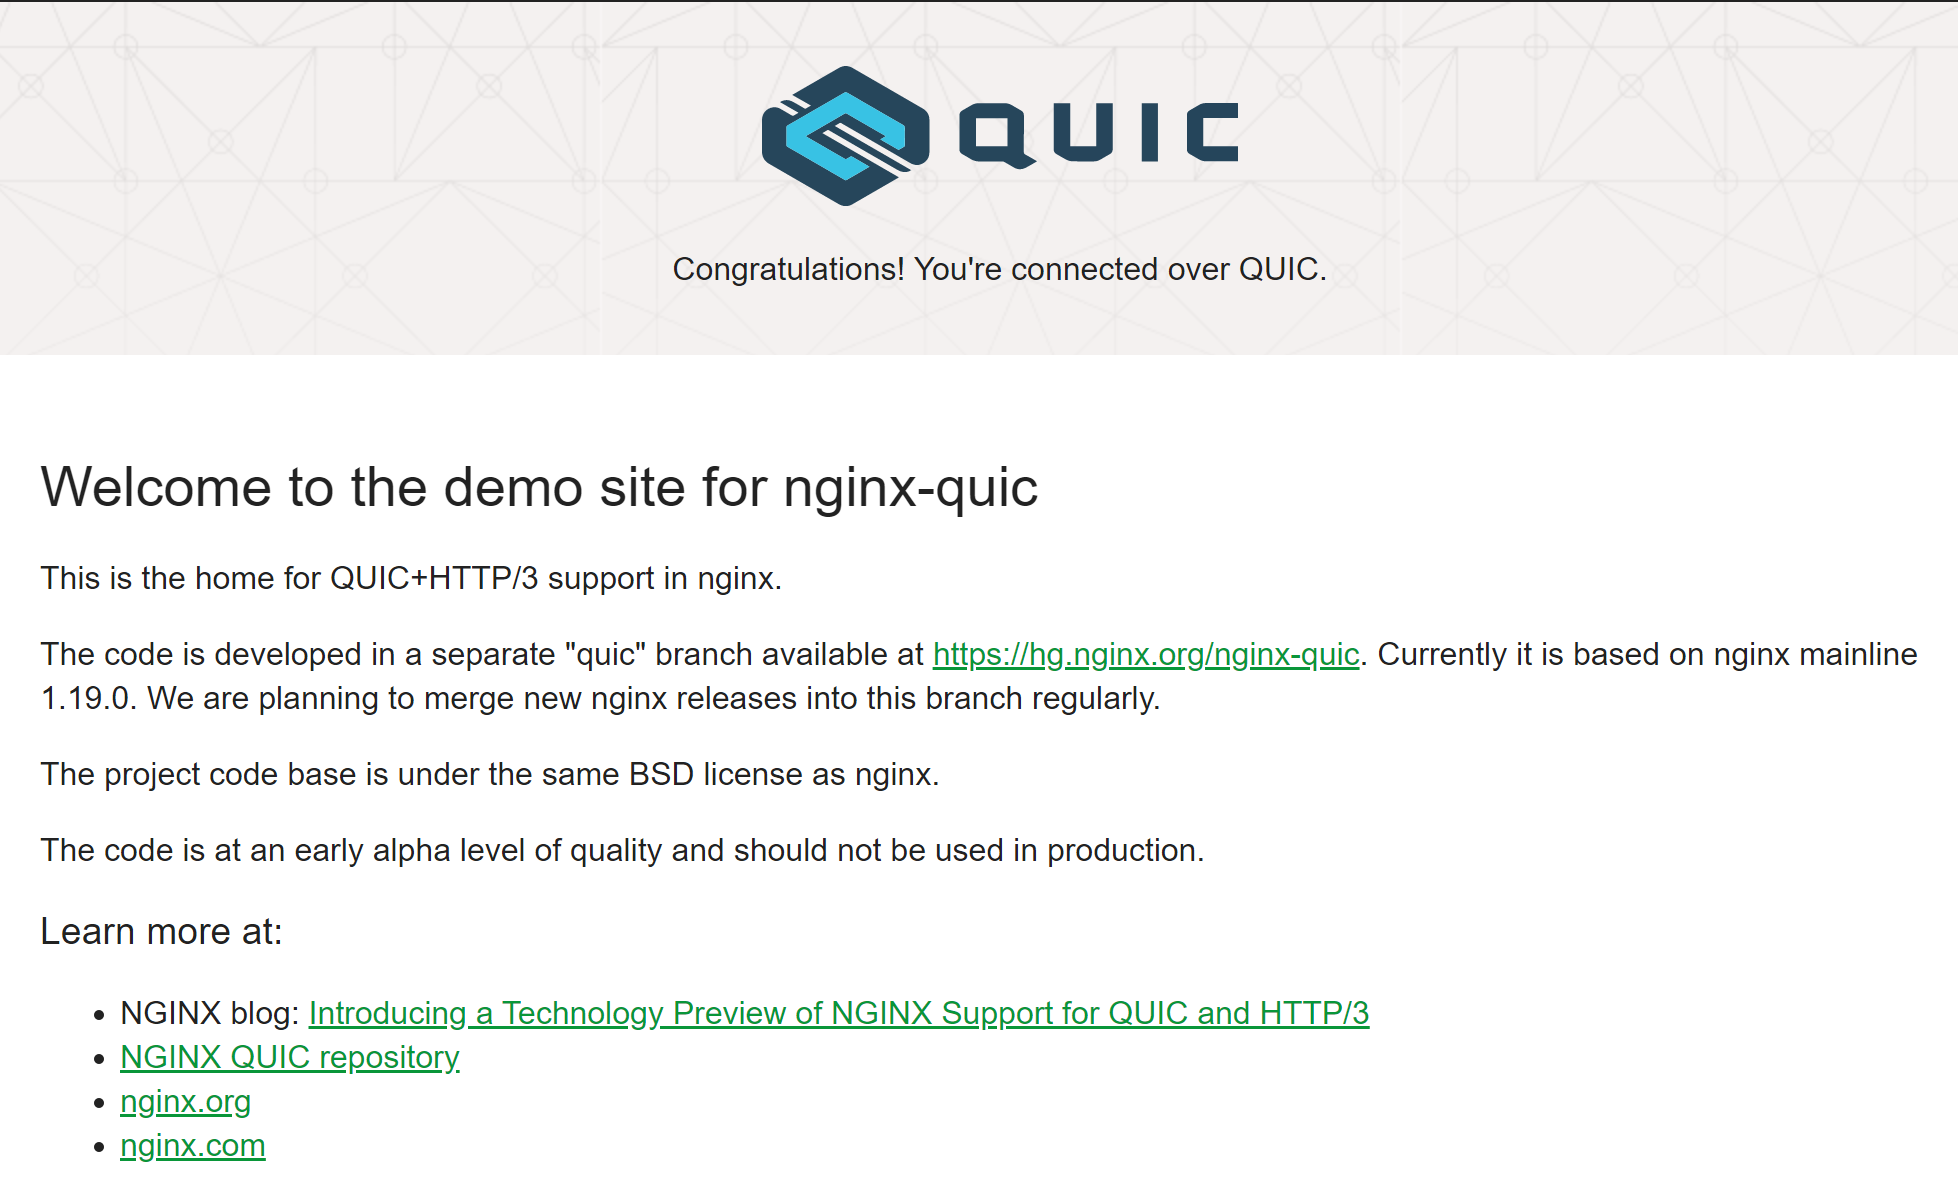
以该快捷方式启动 Edge,访问支持 QUIC 的网站测试,如 Nginx 官方测试页 https://quic.nginx.org/ ,有如下提示说明当前浏览器已成功建立了 QUIC 连接。
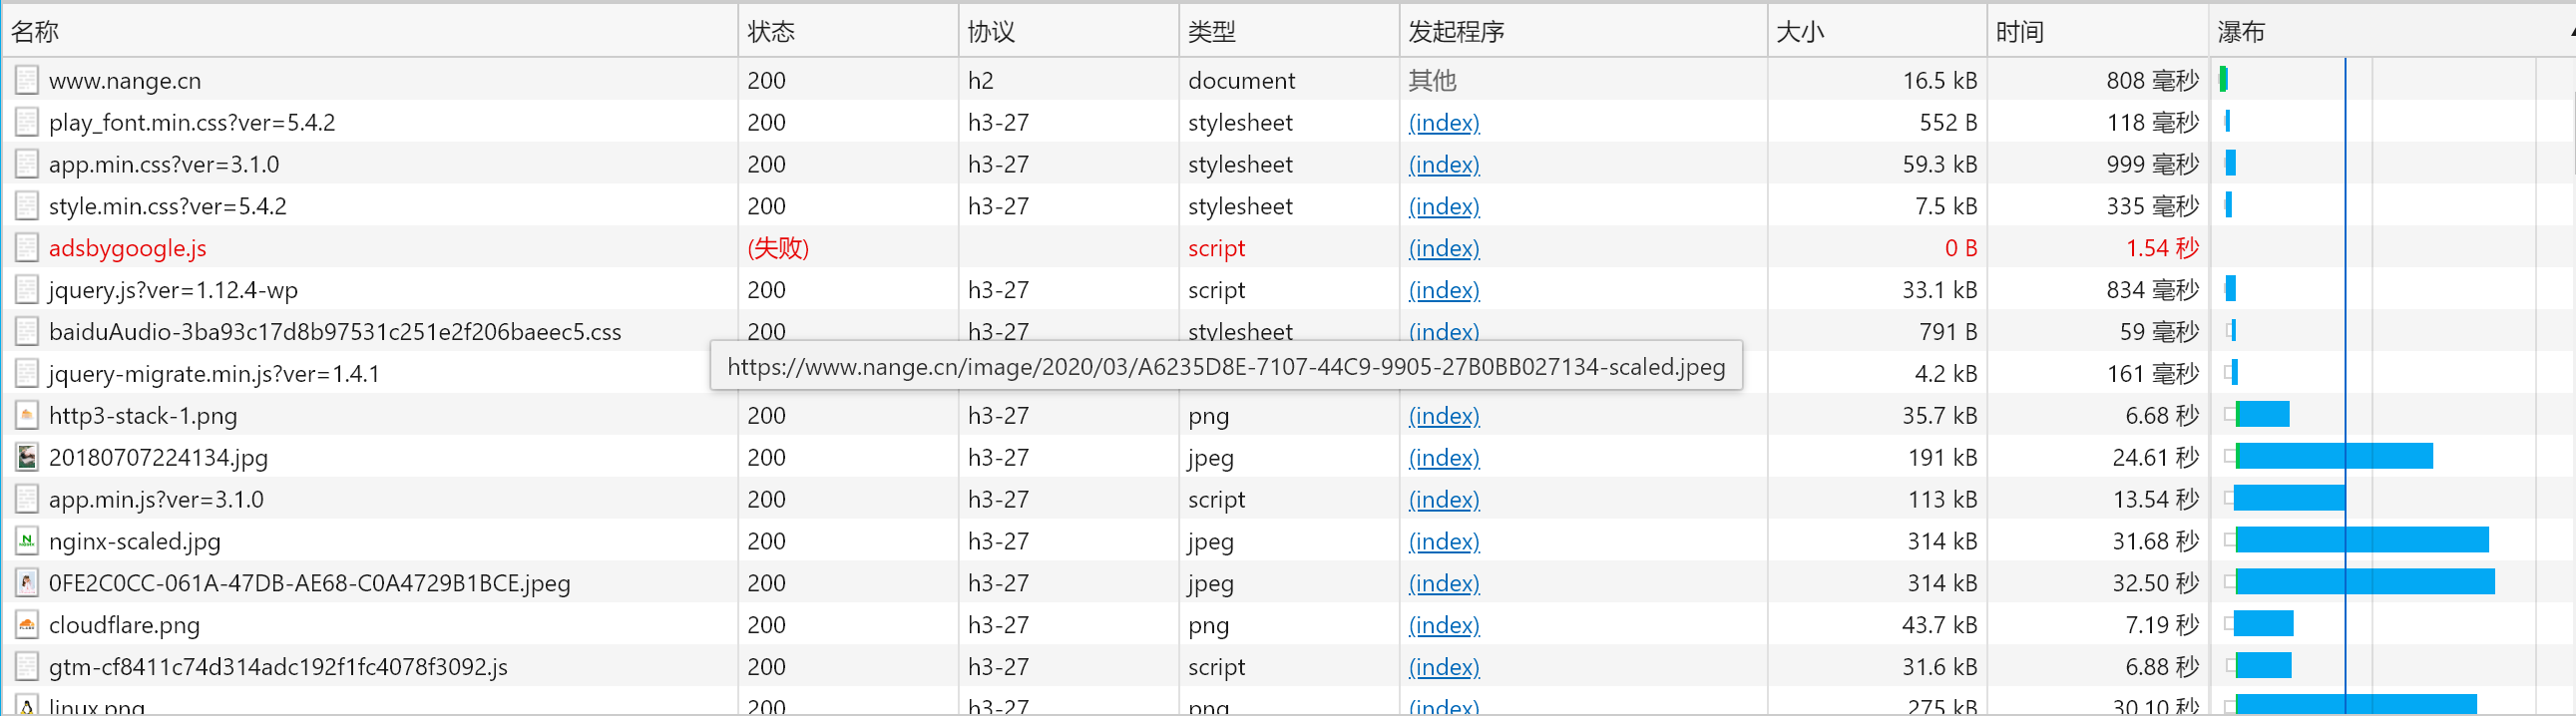
最后打开我的博客 https://www.nange.cn/ 按 F12 查看下,协议类型为 h3-27,说明当前支持的是草案 27 版本。如果协议不是 h3,可多刷新几次。其它浏览器本次并未测试。
说明
目前 Nginx 官版 QUIC 支持草案 29,28,27,默认为草案 27,不支持草案 27 之前的版本。如需支持草案 28 或草案 29,需要修改 Nginx 源码 src/event/ngx_event_quic.h 中的草案版本号,然后重新编译即可。目前官方 Nginx 预览版最高支持 QUIC 草案 27 至 34。以下代码已在新版本中移除。
/* Supported drafts: 27, 28, 29*/
#ifndef NGX_QUIC_DRAFT_VERSION
#define NGX_QUIC_DRAFT_VERSION               29
#endif
本文所说的 HTTP/3 指的是 IETF QUIC,而非 Google QUIC,这两个,现阶段是完全不同的分支。文中说的 Nginx 官版QUIC 包括本博客其它文章之前提到的 Cloudflare 的quiche 补丁只支持 IETF QUIC,还没有支持 Google QUIC,所以 IETF QUIC 在 Google Chrome 浏览器中并不被很好地支持,需要指定启动项,当然它自家的 Google QUIC 倒是支持的很好。最新版火狐是直接走 IETF QUIC 的 HTTP/3 的,且支持得很好。目前经自测 Google Chrome Canary 最新版 v91.0.4455.0 只需要在配置里开启 QUIC 支持,无需额外添加启动参数即可直接支持 QUIC(最低 h3-27)。
由于当前 NGINX 官版 QUIC 还不太稳定,故本站已切回 CloudFlare 的 Quiche 版的 QUIC。
结束
Enjoy it !